Installation
Welcome to the AstroSpectro pipeline installation page!
You have two options to get started: via the cloud with GitHub Codespaces (simple and fast) or manually on your local machine.
For detailed explanations, see the User Guides.
Option 1 — GitHub Codespaces (Recommended)
This is the simplest method. It requires no installation on your computer.
Step 1 — Create the Codespace
- Go to the project GitHub repository.
- Click
< > Code→ Codespaces tab. - Click
Create codespace on main.
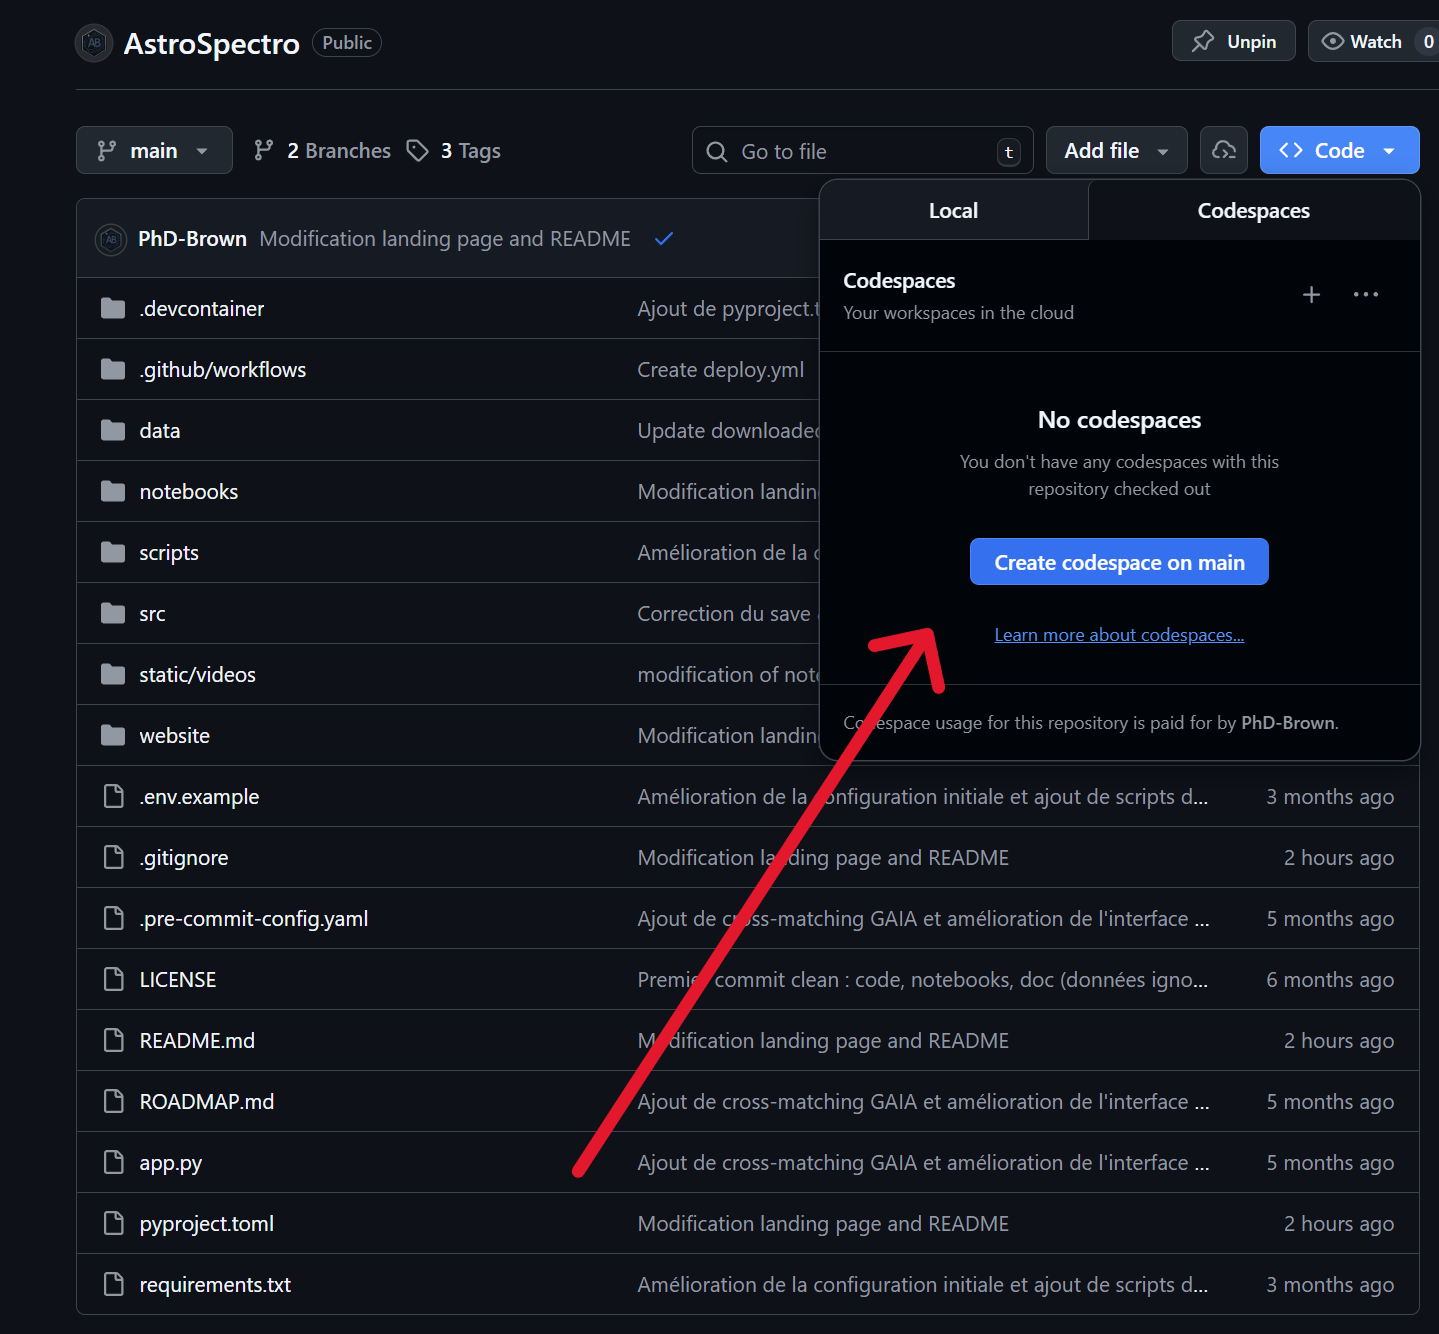
GitHub → Code → Codespaces → Create codespace on main
The Codespaces environment is a full virtual machine. While code execution is fast, I/O operations (such as downloading large datasets) depend on cloud bandwidth, which may cause a slight delay compared to a local SSD.
By default, Codespaces opens in a VS Code-style interface. If you prefer classic notebooks,
click the menu on your Codespace and select Open in JupyterLab.
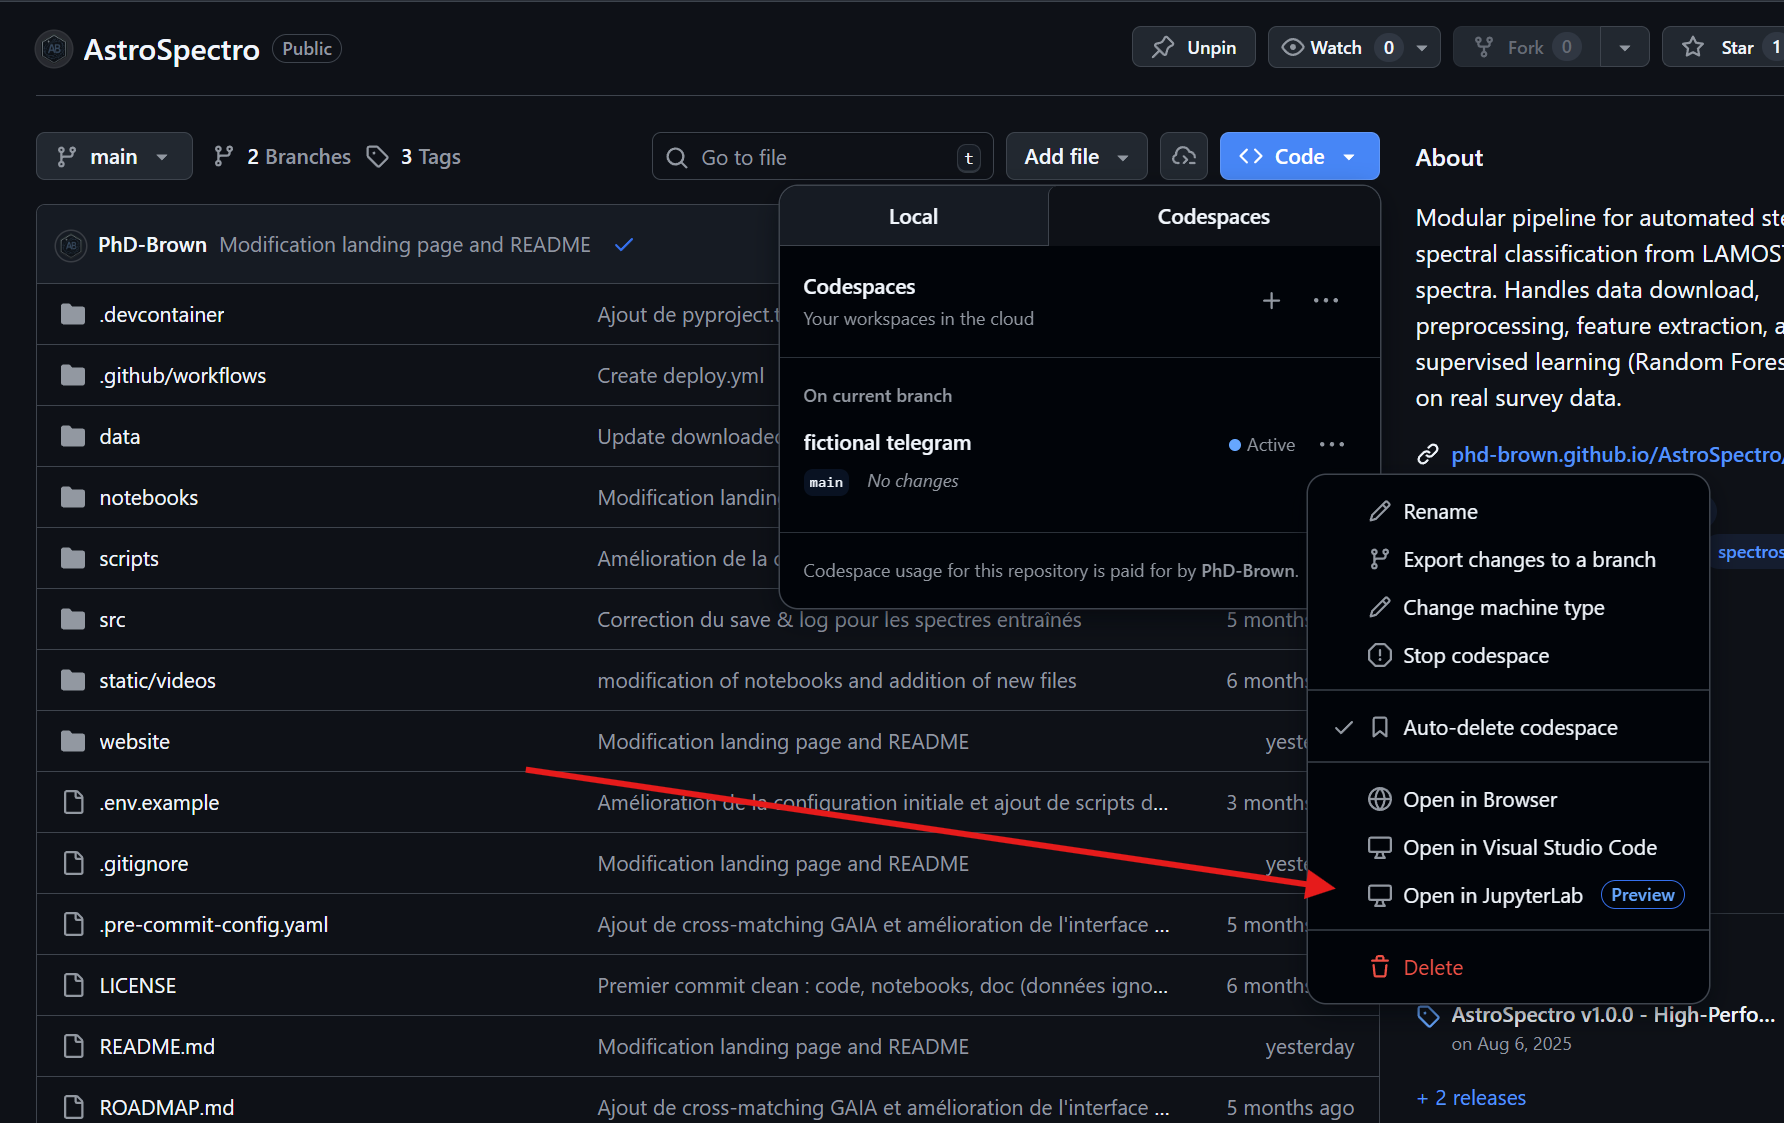
Open in JupyterLab
Step 2 — Configure .env (Gaia)
Rename the .env.example file to .env and fill in your
Gaia connection credentials.
Never commit your .env file to GitHub. It contains your passwords.
Step 3 — Select the correct Kernel (Jupyter / VS Code)
In Codespaces, open a notebook (.ipynb) then:
- Click Select Kernel (top right)
- Choose
venv (Python 3.11.6)
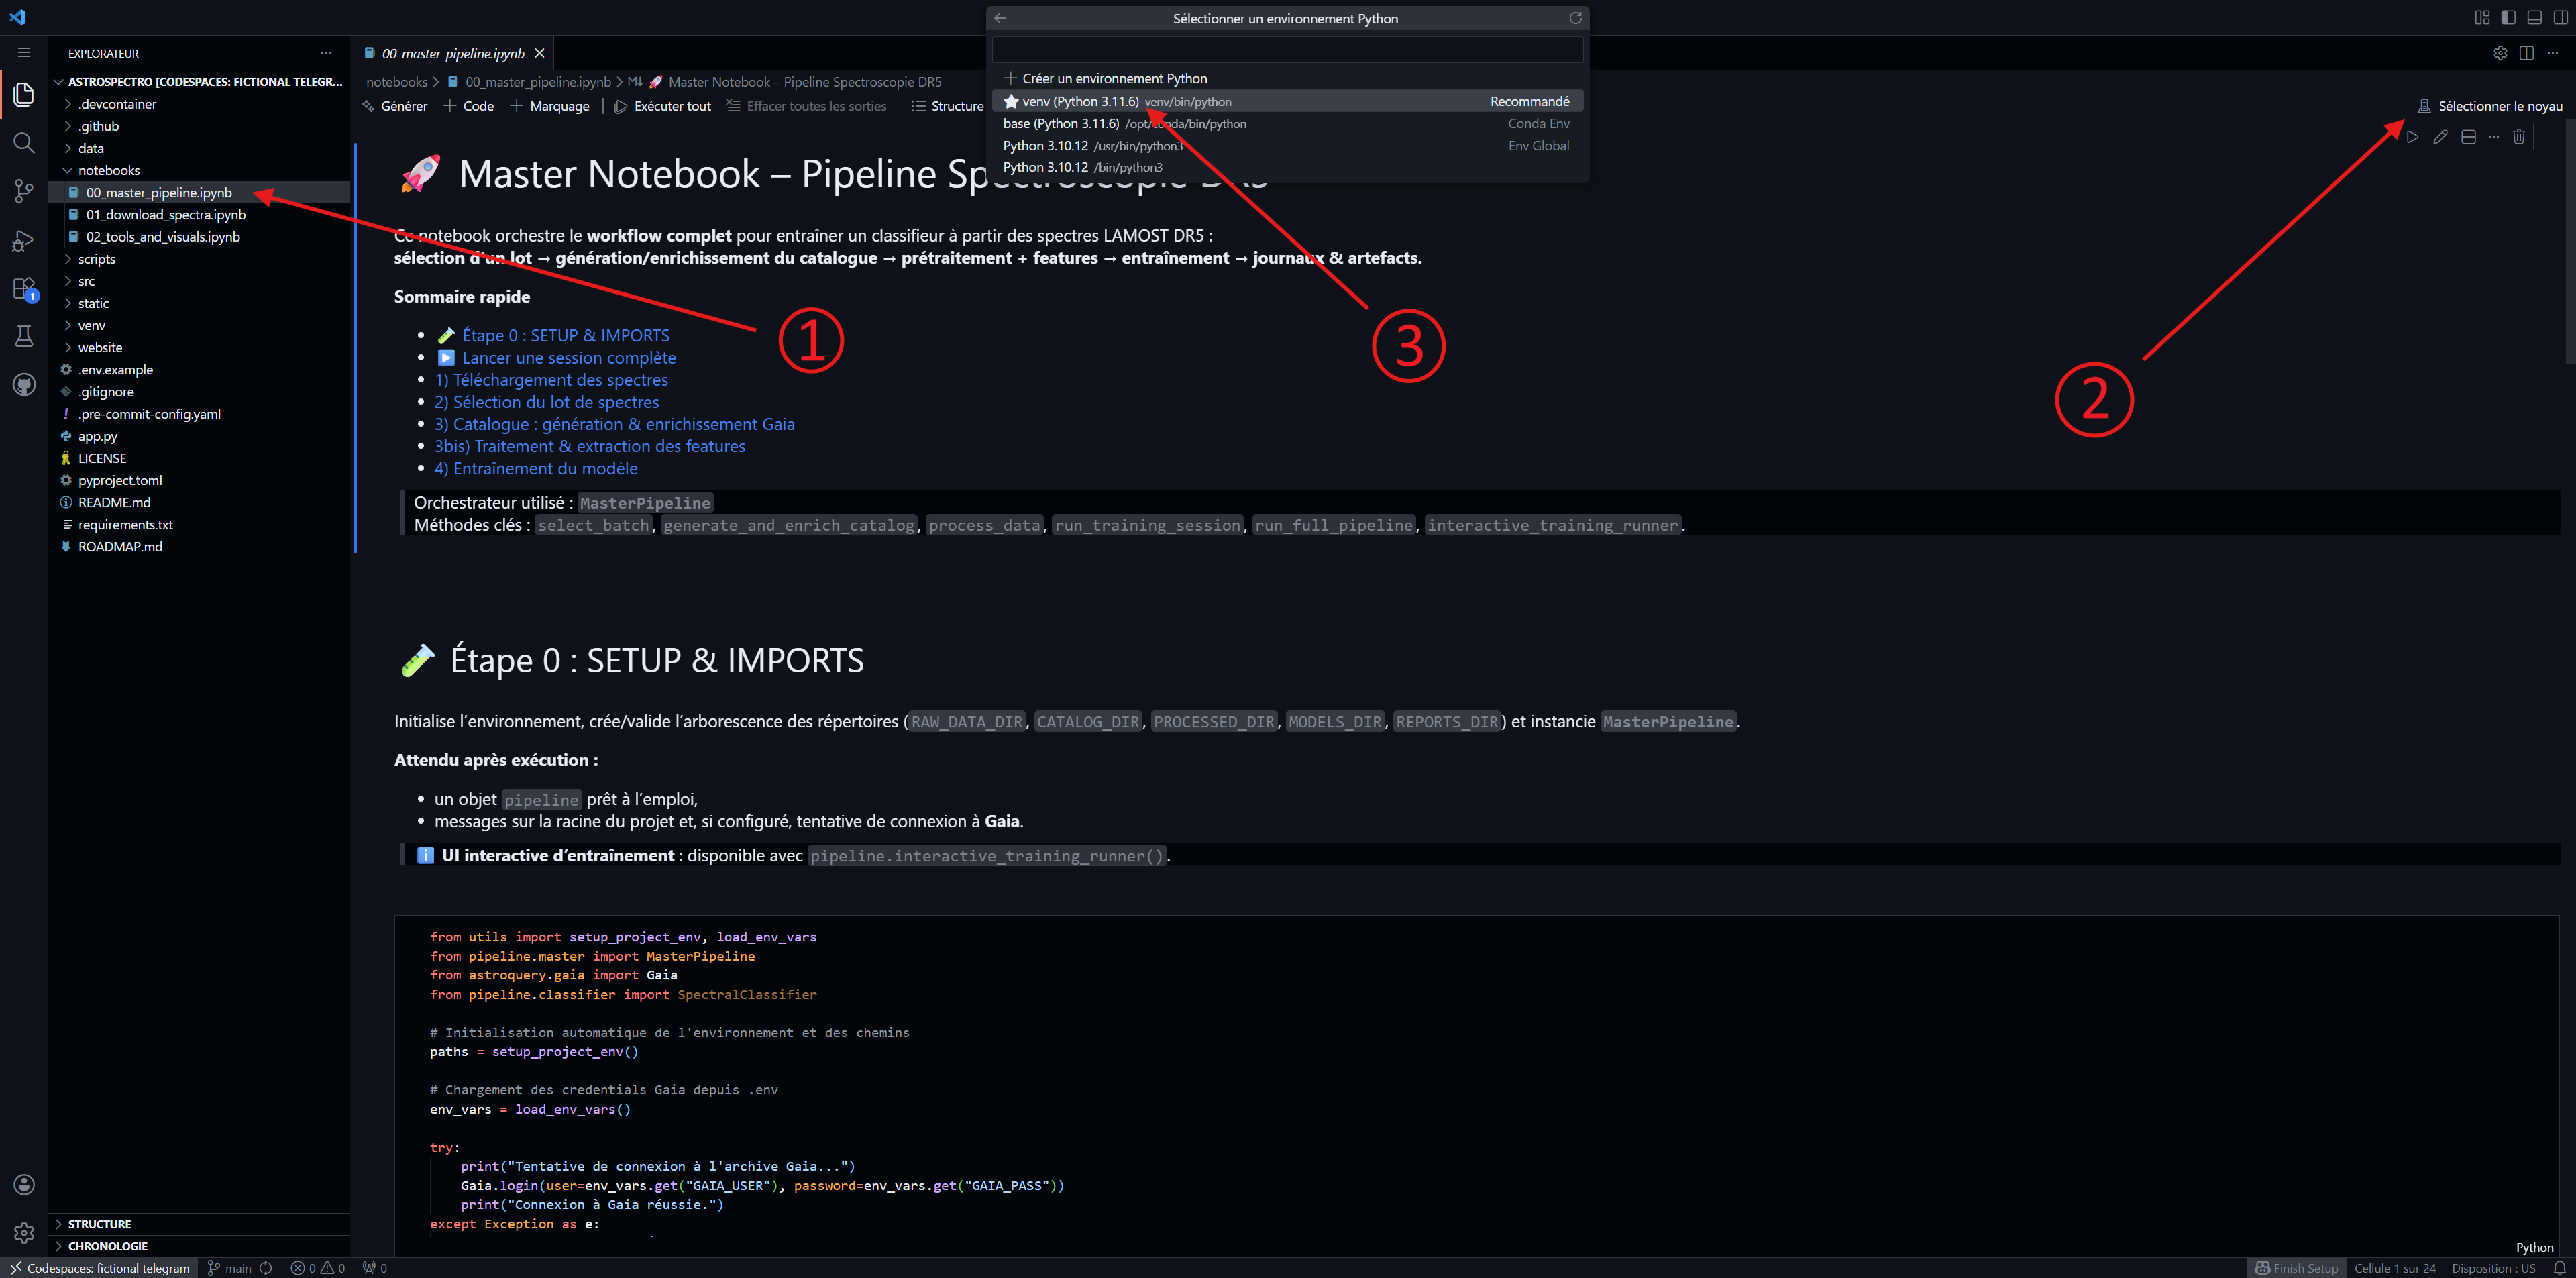
Open a notebook → Select Kernel → venv (Python 3.11.6)
If you don't see the venv kernel, restart the notebook (Restart Kernel) or reload the Codespace page.
Step 4 — Installation complete!
Your environment is now fully configured: dependencies are installed and the Python kernel is ready to use.
What's next?
Time to take action! To learn how to download your first spectra and run your first scientific classification, proceed to the next section:
Step 5 — Managing your Codespace (Important)
If you use GitHub Codespaces, keep in mind that usage consumes compute minutes (limited, even for students).
- ⏸️ Stop: Pauses the machine. Your files, downloaded data, and
.envenvironment are saved. This is the recommended action when you finish for the day. - 🗑️ Delete: Completely destroys the environment. Any work not saved to GitHub (via
git push) will be lost. Use this only for cleanup.
How to stop cleanly:
- Go to your dashboard: github.com/codespaces.
- Click the three dots
...next to your active instance. - Select Stop codespace.
(Note: By default, Codespaces also stops automatically after 30 minutes of inactivity.)
Option 2 — Manual Local Installation
This method installs the project on your own machine. Make sure you have the following prerequisites:
- Python 3.11 (recommended and tested version).
- Note: Python 3.9+ may work but is not guaranteed.
- Git installed.
- (Optional) JupyterLab or VS Code to run notebooks.
Step 1 — Clone the repository
Open your terminal and run:
git clone https://github.com/PhD-Brown/AstroSpectro.git
cd AstroSpectro
Step 2 — Install (Two methods)
Choose the method that suits you best.
⚡ Method A — Automatic Installation (Recommended)
We provide scripts that create the virtual environment, install dependencies, and configure the Jupyter kernel for you in a single command.
On Windows (PowerShell):
# 1. Allow script execution (temporary for this window)
Set-ExecutionPolicy -Scope Process -ExecutionPolicy Bypass

# 2. Run the script
.\scripts\setup.ps1
On macOS / Linux:
# Grant execution permissions if needed
chmod +x scripts/setup.sh
# Run the script
bash scripts/setup.sh
🛠️ Method B — Manual Installation (Step by step)
If you prefer to control each step or if the scripts don't work, follow this procedure:
1. Create and activate the virtual environment
# Create
python -m venv venv

# Activate
# Windows (PowerShell):
.\venv\Scripts\Activate.ps1
# Windows (CMD):
.\venv\Scripts\activate.bat
# macOS/Linux:
source venv/bin/activate

Terminal with venv activated
2. Install the project and its dependencies
The -e . option is crucial for development. We use python -m pip to guarantee
installation in the correct environment.
python -m pip install --upgrade pip
python -m pip install -e .
python -m pip install -r requirements.txt
3. Register the kernel for Jupyter
This step allows Jupyter to recognise your virtual environment under the name "AstroSpectro".
python -m pip install ipykernel
python -m ipykernel install --user --name astrospectro --display-name "AstroSpectro (Py3.11)"
Step 3 — Configuration (.env)
As with the cloud option, you need to configure your access credentials.
Rename the .env.example file to .env and fill in your
Gaia connection credentials.
Never commit your .env file to GitHub. It contains your passwords.
Step 4 — Installation complete!
Your local environment is now ready: the virtual environment is activated, the project is installed in editable mode, and the kernel is registered.
What's next?
Time to test your installation! Proceed to the next section to learn how to use the pipeline on your data.
- If you need to start from scratch (full cleanup), use the cleanup scripts:
- Windows:
.\scripts\clean.ps1 - macOS/Linux:
scripts/clean.sh
- Windows:
- Check the FAQ section in the documentation.
- Open a GitHub issue to get help.
Congratulations — you are ready to explore AstroSpectro!